Potato Quiche Recipe

Hi There!

I wanted to share this delicious potato quiche recipe that I made not once but twice this week! It is seriously so good y'all! I got the inspiration for this dish from a similar appetizer my husband and I had at a restaurant we went to on date night! He took me to a spanish restaurant called Malabar here in  Charlotte! I had never heard of it but it was really really good. It's a cute little place uptown. Malabar is mainly known for their Paella, which I must say is amazing! They have tapas too. One that we tried was a potato and onion tostada kind of a thing. It was so good! When we had it I knew I could re create it into a quiche!

Quiches are so easy to make! They taste great as left overs, and it can be eaten for pretty much any meal of the day. I typically make a spinach and swiss quiche that is really good but I think this potato and onion one has it beat!

Ingredients

5 or 6 eggs
vegan pie crust
small yellow potatoes
1/2 spanish onion
1 cup of fresh spinach
3 twigs of fresh thyme
haf and half
heavy cream
2 cups shredded parmesan cheese
1/2 cut swiss cheese
salt
pepper
garlic powder
paprika

Instructions

Step 1: Preheat oven to 375 degrees. Set out pie crust to unthaw then clean and cut your potatoes and bring them to a boil. 
The first go round I used a few small purple potatoes. They are so pretty. I think any potato will due if cut small.
Step 2:  While your potatoes are boiling, cut your onion and reserve in a large mixing bowl. Add in your 5 eggs and fresh spinach and whisk together. 

Step 3: Now drain and rinse your softened potatoes with cool water and add them to the bowl. Stir in potatoes gently. Season generously with salt, pepper, garlic powder and paprika. 

Step 4: Add in about 1/2 cup of heavy cream, 1/3 cup of half and half and your cheeses and fresh thyme. 
Don't quote me on the cream and half and half measurements. Take it slow with these. You don't want it to be too runny. I really want to find some vegan alternatives to those two ingredients I'm lactose intolerant but this dish doesn't bother me thankfully.

Step 5: Pour your filling into your pie crust and pop it into the oven for about 35 to 45 min or until the top is dark gold brown.
I found these vegan crust at publix! It is made with no butter and you would never know!

Step 6: Let your quiche cool and enjoy! It'll have your house smelling delicious!

Love, 
April. 


Unice Hair Review

Happy Sunday Everyone!

Today I'm here with a quick hair extension review. I really like wearing hair extensions. They can be really low maintenance and convenient. I typically will get side part sew in with minimal leave out. After seeing many positive reviews on youtube I decided to give this hair a try. I was not disappointed! The hair came nicely packaged and was super soft. It has been very low maintenance and easy to style as well. I have washed my hair twice with these extensions in and it has been a breeze.  The hair has maintained its integrity with each wash.

Price

This hair is extremely inexpensive!  I purchased three 18" bundles and spent only $104.00 with shipping! Kind of sounds too good to be true right? I know, I was skeptical too but it really is great quality for the price. I always wear Bleu Ribbon hair. It is really high quality, expensive hair. I'm talking $150 for a 14" bundle. While that hair is amazing quality it is just unrealistic to spend that on extensions sometimes. Unice hair is a great cost effective alternative. On their website they are always having promotions, coupons and sales!

Shipping

Shipping was very speedy. My purchase took only 3 business days to arrive! I was so excited about this. There have been times that I procrastinated on buying my wefts knowing my hair appt was right around the corner. Take it from me, just don't do it! Order your hair well in advance ladies. I was also able to snag free shipping with a coupon code too!

Variety

Unice has a great website. On it they offer many different hair textures, bundle deals and lengths. In doing my research prior to purchasing I was happy to find that their site seems to always be well stocked. I really liked that. There is nothing worst then being ready to make your purchase just to find the length or texture  you want to be out to stock. The hair texture I purchased was indian natural wave. That texture matched my natural pressed hair well. It was dense and had a low luster that made my natural texture blend well.

Check out their website!

https://www.unice.com

Check out my review and demo on my youtube channel!

https://www.youtube.com/watch?v=YSDERwWJNBw

Love,
April.

Class Pass Review

Happy Monday Y'all!

Today I am sharing my review on Class Pass. I heard mention of it on youtube first and decided to look it up online. I immediately loved the concept! Class Pass is a subscription service that allows you to take classes at many different gyms and studios in your city. I think it's awesome! There are a large variety of classes and studios featured on the application. From yoga to spin to cross fit to kick boxing. Of course the variety of classes featured is based your location. You can purchase a 3, 5 or 10 month class pass. Oh, and first time users get 5 classes for only $19! What a steal! Literally one class at a popular yoga studio in Charlotte that my mom goes to religiously is $15 for ONE dog on class! Smh.

Class Pass Pros


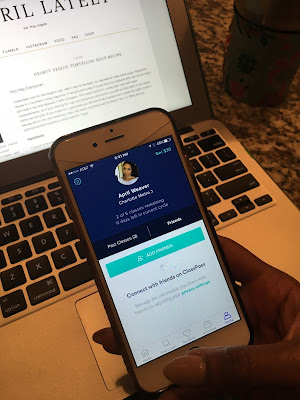
 1. The App!

I love how user friendly the app is. It's very simple and gives you just the information you need.

I organize my apps by category and I store my class pass app under my health app grouping. (disregard my cracked screen)

2. The Variety!

Like I said this is based on how saturated your city or town is with gyms and studios. In Charlotte, NC  there is gym or studio on pretty much every corner. This allows for a ton of options to choose from. As you can see, the app shows you all the gyms and studios that offer classes through class pass. It list them by day and time. You can also search for a specific studio by typing it in the search bar. Once a class is selected it also gives you the difficulty level, instructor and amenities the gym or studio offer such as mats, towels, shower and parking. Because there are so many different things offered you can really try out a lot and figure out which workouts you like or benefit from most. 
The app even shows you which location and which instructor is leading that class too!


I love how some classes have a description or brief expectation.
Class Pass Cons

1. Pass Limitations!

You can only attend 2 classes per studio or gym per cycle. This can kind be a drag if you find a studio you really like. I have already attended two classes during my current months cycle at a studio called AIR. On Dec. 21st  I went to a Floor Lab (barre) class at this studio and it really kicked my butt! I loved the energy and the work out! During this class we did a lot of inner thigh and ab work. It was so intense.  Needless to say I went back for more on Jan 4th. This time it was a AIR Core class. I was a bit intimidated because I had never done aerial fitness. My abs are pretty strong so I didn't think I would have too much trouble. Boy was I wrong! lol I struggled but it was so fun! I wish I could go more this cycle but I have reached my 2 class per studio limit. I could always ditch class pass and purchase a pass to this studio exclusively. This is probably what most studios on class pass are hoping new comers will do. Smart. 
How cute right?! Loved both classes I took here. The AIR Core instructor Chelsea wasn't the most friendly but she did come help when I started swinging from the rope lol.

2. Automatic Charges!

If you have ever purchased a subscription service you know canceling them isn't nearly as easy as purchasing them. Same applies to Class Pass. If you do not cancel or end your subscription at the end of your cycle they will automatically charge you for another 5 class cycle which is $55. Under settings on the app there is no direct option to cancel your subscription. That would be too easy right? To cancel your subscription you have to email Class Pass. 

3. Intimidation!

This con really has nothing to do with Class Pass itself. Being a new comer to a studio or gym can be very intimidating. Especially not really knowing what your walking in to. I mean, granted, you have the class description and reviews to read but still its scary. I found myself having to give myself a pep talk before walking into to a class. Other people attending that class may be members at that studio. They probably have made friends there. They have matching studio t-shirts. They may know the instructor personally. It can kind of make you feel like an outsider if you walk into a class with a weird vibe. I see this a pro and a con. 

This can also help you step out of your comfort zone! I desperately needed that. I love going to the gym alone or with my husband. I'm so bad. I go to the gym at a specific time of day because I know I'm likely to be the only one in there. If too many people start to enter I will leave! Straight up leave! It was terrible. This year I wanted to change that. Class Pass has helped!


All in all, I think Class Pass is AWESOME! I highly recommend it! I plan to renew for another 3 class cycle as well! Try it out! I mean 5 class for $19! You can't beat that with a stick!


Love,
April.

Hearty Veggie Tortellini Soup Recipe

Hey Hey Everyone!

I have been sick for the longest! Ugh. Well 7 days to be exact, so I decided to make some soup! I found the recipe in a Southern Living magazine. It had ground turkey in it and since my husband and I do not eat meat I just took it out and replaced it with chickpeas. This soup is bomb!!!! I rarely ever cook with exact measurements, so if your looking for cups and teaspoons and ounces you will not find them in this recipe. Sorry not sorry lol. If you make this I guarantee you will love it! My husband ate 2 bowls the night I made it. We ate off of it for the following 3 days. My sisters boyfriend said he loved it too. It is filling and just yummyncomfort food but a little healthier. Enjoy!

Ingredients

1 bunch of fennel (4 stalks)
1 spanish onion
1 tbsp of minced garlic 
1 pint of baby bella mushrooms
2 tbsp of olive oil
1 large can of fire roasted crushed tomatoes
2 cans of chick or garbanzo beans
2 tbsp of tomato paste
1 1/2 cartons of low sodium veggie stock
4 cups of water
3 hand fulls of curly kale
1 bag of dry 3 cheese tortellini
fresh thyme
garlic powder
paprika
salt 
pepper
cayenne Pepper

Instructions

Step1: Start out by cutting up the veggies. 

An important tip is to cut the veggies the same size. I kind of diced the onion and cut the mushroom and fennel the same small thin size. The recipe in the magazine actually called for celery but I get so bored and blah with celery. I decided to get a little fancy and do fennel. Fennel is like super food! It has so many health benefits. I found this article on fennel that really breaks down all its nutritional factors. I cut the stalks of the fennel pretty thin. Fennel is very similar to celery in texture but just more fragrant. More pleasantly fragrant. I just hate don't like how celery smells lol. 

Step 2: Heat up your olive oil in a large pot and add in your chopped veggies and garlic.

When you start to sauté your vegetables they will be a bit watery. Cook them on medium/high heat for about 15 min or until all that water evaporates. 
I add the minced garlic toward the end so it does not burn. Also cookware is by Rachel Ray and I love it!

Step 3: Spoon in your tomato paste and stir in with the veggies. Let this warm for about a minute.

Step 4: Add in vegetable stock and water. Reduce heat to medium and let this simmer for about 25 minutes. 

I try to always only cook with organic foods and also low sodium foods. It really makes a difference. 

Step 5: Add in your large can of fire roasted crushed tomatoes and rinsed/drained chickpeas and 4 twigs of fresh thyme. Continue to let all the yummy flavors simmer.

I think the original recipe called for fire roasted diced tomatoes but I didn't want it too be too chunky since I knew I was adding in chickpeas so that is why I did crushed. 

Step 6: Clean and dry your kale. In a separate pan lightly steam your kale. Season with salt and pepper.

So during this step I simply placed the clean kale in a hot pan with about a tablespoon of olive oil. Once in the pan I sprinkled about 1/4 cup of water on top and placed a lid on top.  I let it steam for about 5 minutes.

Kale is so pretty and can you believe it contains like 4.3 g of protein!
Step 7: Add the steamed kale into the simmering soup.

Step 8: Add in the dried 3 cheese tortellini noodles. 

If you are going to be freezing this soup I would not add the noodles. If you do the noodles will absorb the soup liquid before it freezes and they will swell and loose their shape and that just isn't cute. So if you are freezing some just go on and reserve that portion now in your freezer bag. When you unthaw you can just throw in your noodles then. 

I found these noodles in the dried noodle isle at Publix.


Step 8: Add in some salt, pepper and cayenne pepper to taste. Take out your twigs from the thyme. Bowl up your soup and serve with warm bread or crackers!
Enjoy!

And  yes our Christmas is still up. Don't judge lol.


Love Always,
April.


New Year, New Visions

HAPPY NEW YEAR!!!!


Can you  believe its a brand new year?! 2016 flew by to me! I was really happy with 2016. It had way more ups than downs and for that I am very thankful. It's cliche to say but it is the perfect time for reflection.

 Every year I make a vision sheet for the upcoming year and reflect on what  I learned and what I was able to accomplish based off the previous years sheet. For me this is so much fun. It feels awesome when you see the magazine clippings and inspiring photos you pasted down actually come to life. Here are some key pointers on what I do to really make these vision sheets come alive.

1. Put your vision on a standard sheet of paper size vs. a big board. 

      When your sheet is a standard paper size sheet it allows it to be more mobile. You can fold it in     a planner or put it in a folder or notebook. I also like to think of it in the psychological since. Since your goals and inspirations condensed enough to fit on a sheet of printer paper subconsiously you  you view them as more attainable or easier to accomplish. This theory comes from the same philosophy of condensing your task into a list making you likely to a accomplish more. I promise I didn't just make that up lol. 

Here is my vision sheet from 2016. I put it in a sheet protector just to preserve it.


2. Hang our visions in a private place where you can see it every day.

I put my vision sheet in my closet right above my laundry basket. I think its important that you put your vision sheet in a private place. Your visions are very personal. Not everyone should be able to view them and make unsolicited comments or give unsolicited advice on your goals and ambitions. Seeing your goals every day really helps keep them relevant. You don't need to study it daily. I mean, you know what it is you want to achieve, but seeing a word or phrase or image helps prevent them getting lost in the chaos of life.  This is also why #1 is important. Its a hell of a lot easier to slap some craft tape on the back of a sheet of  paper than it can be to hang a heavy board up. Plus do you really have space for a big board?

3. Have all your supplies in advance.

This really seems like a obvious point but it will make doing your sheets so much easier. Through out the year I just stash magazines, junk mail and newspapers in a basket. When I go to my aunts house, beauty salon or dentist and they have tons of magazines I'll just ask if I can have  the one I'm looking at. You would be surprised but I've never been told no. When I get a Michael's coupon I go and get the glue sticks, construction paper and stickers. I am still using supplies I bought 2 years ago. It doesn't take much. This allows you to just grab your stuff and start! 

I was clearly excited to start! Having your stuff all spread out on a table or floor is the best!
 Add me on snapchat: mcaprilately

4. Keep all the previous years vision sheets in a binder! 

This time next year I'll take my 2017 sheet down from my closet wall, put it in my 3 ring binder and flip through the old sheets and talk with my husband about everything we wanted to do, did and didn't do. On the back of the sheets I write down all the awesome and bad or not so awesome things that happened. I think saving the sheets is almost like scrapbooking. You can save them, reflect on how far you've come or let your kids look through them one day or something. 

                                       
                                            Just a basic ole 3 ring binder that I decorated with stickers!


Happy New Year! 
Love,
April Weaver