Tulum, Mexico Recap

 Hey y'all!

My sister and I treated my mom to 4 days, 5 nights in Tulum, Mexico for her 60th birthday. And a time was definitely had! We booked our flights and lodging through a travel agent we trust. I'm not going to lie the booking was last minute but we made it happen none the less. Wanted to do a quick recap of our trip here on the blog. 

Where We Stayed

Kore Retreat and Spa Resort. It is the only all inclusive resort in Tulum. The resort was beautiful and really did live up to its title as a retreat. There were a few gripes though. The food was just okay. I have never stayed at an all inclusive resort that had phenomenal food. They did have a fantastic buffet one night with these amazing grilled shrimp skewers. I am still thinking about those shrimp. Saturday night they had a super nice mexican fiesta dinner outside on the beach. They had fresh made empanadas, tortilla taco station and crepe station. It was so good! The rooms were a bit dated and the water pressure in the shower could have been stronger but the resort grounds, pool and views made up for it. Next time I go to Tulum I am not going to stay at a resort. I think I would prefer a boutique style hotel or an airbnb.


This is the view from a cabana on our resort.


This was from the Mexican dinner party on the beach! The food was amazing!


Where We Ate

Every single place we ate at in Tulum was phenomenal. First my sister and I accidentally went on 45 minute bike ride. We stumbled upon a instagram popular match spot called Matcha Mama. We got iced matcha lemonades and matcha nice cream. 

This was a lemonade matcha drink and it honestly was not all that. I think I was expecting it to be sweeter.


Next we stopped for some breakfast along the strip. I had huevos rancheros, shrimp tostadas and a margarita. Literally the best breakfast I have ever had! 


The next day we ventured out to a beach club restaurant called Taboo that came highly recommended. The ambiance and energy was so fun and food was out of this world! We ordered a lot of food too! Ceviche, sushi, greek salad, lobster tacos and salmon tacos. Everything was amazing. 


The next day we walked to the public beach and grabbed some lunch. I had the most delicious tuna salad. Then we got fresh coconut waters! 


Later that night we had an 8pm reservation for my mothers birthday dinner. We took a taxi to the infamous Rosa Negra restaurant. Very beautiful but extremely dark and loud. For appetizers we ordered the street corn and grilled artichokes. We were underwhelmed with the artichoke. They were under cooked. The corn was pretty basic but good. 


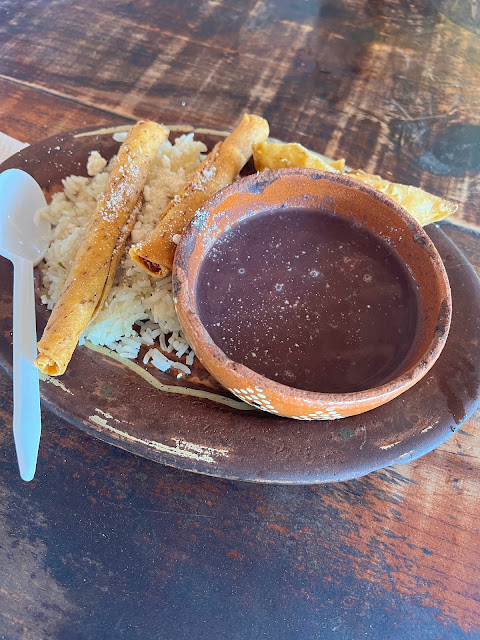
The next day was excursion day! They provided us with authentic Mayan food and it was so simple but so flavorful and fulfilling. Rice, beans, taquitos and eggs with tortillas. I ate every bite and got seconds. 


Custom Nutcracker Porch Decor

 Happy Holidays!

As you know, I am one of those holiday obsessed people. Not just Christmas but all holidays! I wanted to jazz up our front porch with some cute holiday decor. Months ago I was at SAMs Club and saw these really cute brown nutcrackers but the price tag was disrespectful! $300! I just could not bring myself to pay that. A few weeks later, I was in Costco and saw a different version of the brown nutcrackers. They were even pricer at $400! Again I had to pass them by. So I am scrolling Instagram one day and one of my favorite bloggers Liz Rishel posted these 75 inch nutcrackers! It was the price point for me! I could not pass them up! I purchased not one but two and gave them a face lift.


These are the paint colors I used. Each very inexpensive and both purchased at Walmart.  For the darker nutcracker I mixed both shades. For the lighter nutcracker I simply used the color nutmeg. I did have to build the nutmeg color more. I took about 4 coats to get it opaque. 


Its not perfect but I think it came out pretty decent!


Not only do they light up when they detect motion but they also play a royalty song. And the motion detection is better then our ring camera!


This battery operated garland was easy to put up. I just used two large command hooks. The giant ornaments are from Amazon. The rug is from Target but it is several years old. I love how this turned out! I know my boys wont be little for long so I cherish how magical holidays are with young children. 

With Love, 
April W. 


Free Christmas Tree Ornament DIY

 Happy Holidays!

Can you believe I was able to find a 6.5 ft Christmas Tree and decorate it for my sons room for FREE!!!! I know! I can hardly believe it myself!


So after digging through my mess of an attic. I found my old Christmas tree from over a decade ago! Hoarders this is what we live for! Immediately I knew I wanted to use it for my oldest sons room. There was no way I was going to pay $3 to $5 for the specialty ornaments at Target. So while I was digging through them attic I found the bin of stuff from his second birthday! Long story short I turned a bunch of old birthday decor, hot wheels cars and monster trucks into ornaments. It was so easy I had to share it with y'all!

Stuff You Will Need

-A theme

-First you will need these green ornament hooks. They are super cheap from Walmart, Target or Amazon. Get the large and small ones. 

-Random toys

There's really no instructions needed. I would just like to advice that this is best done when your toddler is not home. First, collect all the stuff from previous parties that go with you theme. Then sort out what you want to use as a tree skirt. I had this old tire float thing and I knew it would be perfect. 

It was hell blowing this thing up but I love how it turned out.


Then my husband and I started to assemble the ornaments. We simple either twisted the ornament around the car or monster truck wheel or though the car windows. It worked out really well. I think we ended up doing about 20 cars and 9 trucks. My son has a ton of cars and trucks so this was so clutch!

The larger ornament hooks worked best!


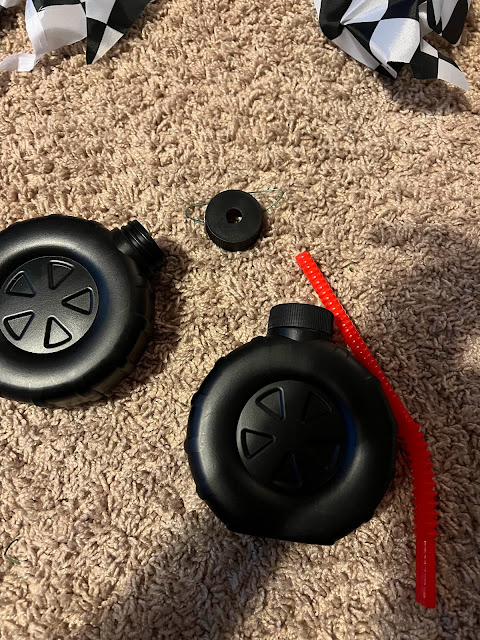
Next I found these cups that I never ended up using for his 2nd birthday. I took the straws out and wrapped the ornament hook around the lid, then twisted it. Boom! Another ornament for free!


I was really happy with this because they are larger and were more like statement pieces. 


Then I found this race car banner. I cut it and used it as a garland for the tree. This worked out well because it helped fill in the tree a bit. 


We decided to top the tree off with none other than Black Panther! I was debating that or a race car hat. T'challa clearly was the only acceptable option.


I love how this turned out! Even better, my son loves it! And even better than that, it was completely free! Take this as a sign to go in your attic and upcycle some old party decor into ornaments. 

With Love,

April W.

DIY Fringe Backdrop

 Hello, hello!

I made a giant 7ft x 7ft DIY fringe backdrop for my sons 4th birthday! All by myself y'all! I kind of picked and pulled inspiration from lots of different blog post. So here is mine to add to the collection on pinterest lol. It was very easy to do but also very tedious. I work and have a 7 month old and a 4 year old, so you can only imagine the loads of down time I have. I started a week before the party and did a little bit each night. If you have older children this could be a fun project to do together. 

Supplies Needed

-poultry fencing

-plastic table cloths

-zip ties

-command strips

-gorilla glue

-scissors 

Tips Prior to Starting

Make sure you get a large flat work space for this project.  I wish I could have worked on backdrop as it hung in its display spot for the party. That would have been ideal. If you can hang this and work on it I would highly recommend that. 

Map out the size and area your backdrop will be displayed before hand. This will allow you to brainstorm so solutions and tools on how your doing to hang the backdrop.

If your backdrop is going be massive like mine, start early! Give yourself  a week or two to complete. Less stress and more fun when you start early! It also allows some room for error. 

This was the focal point for my sons party  and it was very eye catching and fun!


Steps for Assembly

1. Roll out your fencing and cut it to your desired length. I cut two long pieces of fencing then tied together with zip ties from the dollar tree. 

Careful when you purchase your fencing. It comes in a variety of sizes and colors. You could even spray paint it to match your decor if you wanted but you really cant see it. Even with the wind blowing you could barely notice the green. 


2. Cut your plastic table cloths into your desired lengths. They come folded so to speed this up I kept them partially folded, overlapped two of them and then cut them to make more strips with one cut. This allowed me to be a little more efficient. 
I purchased my plastic table cloths from dollar tree, party city and amazon. I ended up using about 4 per row. I cut each strip about 2 inches thick. I found that when I cut then smaller they would rip when I tied them to the fencing. 


3. Begin loop tying the plastic table cloth strip to the edge of the fencing. I skipped one space in between and did one knot up and one knot down. 


Here you can the up down pattern. Choosing not to skip space between strips make the back drop look full. 


4. Continue step with and pattern your table cloth strips in whatever pattern you desire.


I blended two color of teal to give it a little more dimension. Blending table cloth colors by alternating them when looping makes the color pop.


How To Hang Your Backdrop
 
- Get a step stool and some assistance. 
    I had  to recruit my husband for help. We hung this outside on the side of our brick house.
-We used  gorilla glue and clear command hooks. 
    I  was skeptical but this worked really well. Nothing fell the entire party. We just applied a good     
amount of gorilla glue to the back of the clear  hood and stuck it directly on the bricks. 

We put 4 command  hooks along the top, 1 in the middle and 2 at the bottom on each side of the backdrop. The hooks fit right into the holes of the fencing. 


The backdrop turned out amazing! Next time I make one I will play around with the pattern and colors. This is so easy and makes a huge impact on party decor!

Love,
ALW

Beach Vacation 2021 & Family Photo Tips


Greetings! 

When I was younger my family used to go to the beach every year. I loved that tradition
 so much that I knew I wanted to adopt it for my own little family. Three years ago the tradition began for us and its held firm ever since.


Where We Stay

 I can't remember how I stumbled upon it but I found this amazing resort in Hilton Head, SC called Palmetto Dunes. I am obsessed with it! The grounds and landscaping are immaculate. They have tons of communities, hotels, condos and amenities. From onsite bike rentals, restaurants, convenient store, canoe rentals, tennis, pools and beach access. It is perfect! Each time we have stayed here I purchased our lodging through Vrbo.com previously known as Homeaway.com. Very similar to airbnb. The process has been seamless from start to finish. Hands down the best experience with booking was with our most recent rental. The owner of the condo is who I had the pleasure to communicate with and she was so hospitable and accommodating. The condo was updated and spotless! I highly recommend this property


What We Did

This trip we basically took it easy the entire time. We spent a lot of time on the beach. The tide was pretty low most of time which was perfect for Langston. On Sunday we did a family photo shoot with an amazing photographer named Rodney. I got so lucky because about 2 months prior to booking the trip I went online searching to Hilton Head photographers. I found Rodney  with One Moment One Shot Photography on Instagram! Yes, Instagram! I can hardly believe it myself. His work on Instagram and his website is breathtaking. His booking process was so easy too. Correspondence with him the entire time was professional and quick. Because we were familiar with the Palmetto Dunes property and because of how beautiful it already is there it was a no brainer to do the photos right at the resort.  This made everything very easy for everyone. Rodney was even able to do our shoot early to dodge the rain! I will definitely be booking him again in the future!

Tips and Tricks for Family Photos

1. Timing 

    I try to book all of our family photo shoots at least 1 to 2 months in advance. This gives you time to prepare your wardrobe, gather inspiration and it helps your photographer as well. Also the time of day you pick for your photo shoot is key for several reasons. First and foremost if you have a child or children in your shoot you need to make sure it is not during their cranky time or nap time. This is going to save you so many tantrums y'all! There is nothing a toddler hates more than changing clothes or posing when they are exhausted. If your doing photos in nature the time of day is important in regards to lighting. 

2. Picking a photographer

    Do your research! Extensive research. Many photographers specialize in certain types of photos. Studio, family friendly, portrait, maternity, etc. Its up to you to select a photographer that specializes in the photos you want. Ask them questions, check their socials and website. Even check yelp for reviews. There are a lot of scammers out there so be careful. Professional photos can get very pricey so just be careful that the  price you pay is going to deliver the quality it reflects. 

3. Find Inspiration 

    I get lots of inspiration from Pinterest. I literally just searched "family beach photos" and take note on the wardrobe, the poses and the scenery. There is no new idea under the sun. Some photographers even ask you if you have inspiration photos you'd like to share with them.

4. The Wardrobe

    Stay away from matchy matchy outfits! For a studio shoot I think matchy matchy family photos can look nice but for a natural setting I think its best to stay away from every person in the photo wearing the same exact outfit. Cohesive colors? Yes! Even the same color in different hues looks awesome for outdoor photos. I usually pick about four different outfits for myself. Then I run them by my husband so he can pick something out for himself and our son. Luckily, I am the most difficult to style so this makes the process easy. If you are doing more than one look for your family photos its best to try to pick two contrasting looks. A dressy and casual look or dark colors and bright colors, etc. Keeping it simple is something I like to keep in mind as well. This applies to everything. Outfits, makeup, hairstyle everything! Keeping it simple also makes changing clothes between looks quicker and easier. A lot of times different colors and patterns can be a distraction in the photos anyway. 

5. Recruit Some Help

    Pretty much every family photo shoot we have done I have been able to have either my mom or my sister come help us. This is going to be life saving if you are taking photos with children, pets or a large party. For this photo shoot my sister was a God send. She was able to not only get Langston dressed for me but she also made sure he didn't get sand everywhere prior to shooting. She was able to be make him simile, distract him when he wasn't in  the photo and change his clothes when it was time for the second look. Mamas this is going to make your family photo shoot that much more seamless. Again one to two months notice should allow you time to recruit some help from a family member or friend. 

I bought this cute set from Zara online and it turned out perfect. Also there were tons of black ants crawling on my feet in this photo. Watching all the ANTM in high school paid off lol.

Rodney understood the assignment y'all! With the photo package we purchased he edited 30 photos! Turn around time for edits was about 1 week. 


 Making memories with my family is one of my absolute favorite things to do. Time is precious y'all! Spend quality time with ones you love, put your phone down, work can wait. Play in the sand, take the photos, and relish in the memory of it all. 

"A strong black family is one of the most impactful forms of resistance."


Love, 

ALW